Friday , February 28 2025

IP FRR on Huawei routers

What do we have in traditional IP networks?

Let’s assume that there is a fault at the physical or data link layers. Router sees that a physical interface becomes DOWN. After the router detects this fault, it informs upper layer routing system to update routing information. The convergence time is several seconds, what is critical for sensitive services.

That’s why IP FRR has been developed. After we configure IP FRR, a router doesn’t wait for network convergence but a backup link is immediately used to forward packets.

We have 2 scenarios of using IP FRR:

  1. To protect routers in public networks.
  2. To protect CE routers in private networks.

Let’s focus on the first one.

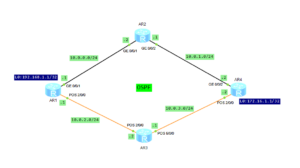
IP FRR topology


I am using OSPF protocol to allow routers to learn routes from each other. Because of greater OSPF cost on POS links, traffic from AR1 to AR4 is forwarding through AR2:

[AR1]dis ip rout
Route Flags: R - relay, D - download to fib
------------------------------------------------------------------------------
Routing Tables: Public
         Destinations : 15       Routes : 15       

Destination/Mask    Proto   Pre  Cost      Flags NextHop         Interface

       10.0.0.0/24  Direct  0    0           D   10.0.0.1        GigabitEthernet0/0/1
       10.0.0.1/32  Direct  0    0           D   127.0.0.1       GigabitEthernet0/0/1
     10.0.0.255/32  Direct  0    0           D   127.0.0.1       GigabitEthernet0/0/1
       10.0.1.0/24  OSPF    10   2           D   10.0.0.2        GigabitEthernet0/0/1
       10.0.2.0/24  Direct  0    0           D   10.0.2.1        Pos2/0/0
       10.0.2.1/32  Direct  0    0           D   127.0.0.1       Pos2/0/0
       10.0.2.2/32  Direct  0    0           D   10.0.2.2        Pos2/0/0
     10.0.2.255/32  Direct  0    0           D   127.0.0.1       Pos2/0/0
       10.0.3.0/24  OSPF    10   101         D   10.0.2.2        Pos2/0/0
      127.0.0.0/8   Direct  0    0           D   127.0.0.1       InLoopBack0
      127.0.0.1/32  Direct  0    0           D   127.0.0.1       InLoopBack0
127.255.255.255/32  Direct  0    0           D   127.0.0.1       InLoopBack0
     172.16.1.1/32  OSPF    10   2           D   10.0.0.2        GigabitEthernet0/0/1
    192.168.1.1/32  Direct  0    0           D   127.0.0.1       LoopBack0
255.255.255.255/32  Direct  0    0           D   127.0.0.1       InLoopBack0

[AR1]dis ip rout 172.16.1.1 verbose 
Route Flags: R - relay, D - download to fib
------------------------------------------------------------------------------
Routing Table : Public
Summary Count : 1

Destination: 172.16.1.1/32
     Protocol: OSPF             Process ID: 1
   Preference: 10                     Cost: 2
      NextHop: 10.0.0.2          Neighbour: 0.0.0.0
        State: Active Adv              Age: 00h00m18s
          Tag: 0                  Priority: medium
        Label: NULL                QoSInfo: 0x0
   IndirectID: 0x0              
 RelayNextHop: 0.0.0.0           Interface: GigabitEthernet0/0/1
     TunnelID: 0x0                   Flags:  D

What we want to do in this lab is to force AR1 router to forward traffic through POS interface, not waiting for control plane convergence.

We can accomplish this by configuring route policy on AR1 as follows:

[AR1]ip ip-prefix ipfrr index 10 permit 172.16.1.1 32

[AR1]route-policy ipfrr permit node 10
Info: New Sequence of this List.
[AR1-route-policy] if-match ip-prefix ipfrr 
[AR1-route-policy] apply backup-nexthop 10.0.2.2
[AR1-route-policy] apply backup-interface Pos2/0/0

Now it is enough to enable IP FRR on the public network:

[AR1]ip frr route-policy ipfrr

We can check what has changed:

[AR1]dis ip rout 172.16.1.1 verbose
Route Flags: R - relay, D - download to fib
------------------------------------------------------------------------------
Routing Table : Public
Summary Count : 1

Destination: 172.16.1.1/32
     Protocol: OSPF             Process ID: 1
   Preference: 10                     Cost: 2
      NextHop: 10.0.0.2          Neighbour: 0.0.0.0
        State: Active Adv              Age: 00h00m06s
          Tag: 0                  Priority: medium
        Label: NULL                QoSInfo: 0x0
   IndirectID: 0x0              
 RelayNextHop: 0.0.0.0           Interface: GigabitEthernet0/0/1
     TunnelID: 0x0                   Flags:  D
    BkNextHop: 10.0.2.2        BkInterface: Pos2/0/0
      BkLabel: NULL            SecTunnelID: 0x0              
 BkPETunnelID: 0x0         BkPESecTunnelID: 0x0              
 BkIndirectID: 0x0

Read More »

configuring SNMPv3 on Huawei devices

SNMPv1 and SNMPv2c protocols security model uses the community-based pseudo-authentication. That means that a password (called a community string) is sent in a clear text between a network management station and managed devices. Both SNMPv1 and v2c are subject to packet sniffing because they do not implement encryption. Security has been the biggest weakness of the SNMP since the beginning. More about SNMPv2c concepts, operation and configuration you can find at “SNMPv2c configuration on Huawei devices“.

What if we want SNMP to be used over a public network?

SNMPv3 can be implemented. It provides important security features, which are not available in both SNMPv1 and v2c:

  • Confidentiality – encryption of packets to prevent snooping by an unauthorized source
  • Integrity – to ensure that a packet has not been tampered while in transit using optional packet reply protection
  • Authentication – to verify that a packet comes from a valid source.

SNMPv3 defines some new concepts: security level, user and group. The following security levels exists:

  • Authentication without encryption – authentication keyword in CLI – only the authenticated administrators can access the managed device.
  • No authentication and no encryption – noauth keyword in CLI – this security level can be used only in secure networks
  • Authentication and encryption – privacy keyword in CLI – only authenticated administrators can access the managed device and transmitted data is encrypted preventing interception or data leaking. This level should be used over the networks vulnerable to attacks.

A group defines the access policy for a user. Access policy defines which SNMP objects can be accessed or which SNMP objects can generate notifications to the members of a group. If the authentication and encryption mode are not specified, a user can only access views in non-authentication and non-encryption mode.

When using SNMPv3, system firstly verifies a user based on the configured authentication and encryption mode. After the user passes the authentication, the system verifies which SNMP views that user can access, based on the group to which the user was assigned.

A group can be configured using command syntax:

snmp-agent group v3 group-name { authentication | noauth | privacy } [ read-view read-view | write-view write-view | notify-view notify-view | acl acl-number ]

An SNMPv3 user can be assigned to the group using the following command syntax:

snmp-agent usm-user v3 user-name group-name [ authentication-mode { md5 | sha } authkey [ privacy-mode { aes128 | des56 } prikey | plain-text ] ] [ acl standard-acl ]

After an SNMPv3 group is configured, the system can effectively control the access rights of all users in the group, using the group settings. User access can be encrypted and authenticated, authenticated but not encrypted, or neither authenticated nor encrypted. If the access level of a user is lower than the security level of the specified group, the access fails. When the group, to which a user belongs, has multiple security levels, the user can select the group with the highest security level, among the groups that can be accessed, and access the view of the group.

Let’s configure SNMPv3 read access for NMS1 IP: 150.100.12.1. In order to do that, NMS1 user will be configured and added to the GROUP1. NMS1 user will use SHA algorithm with AUTHKEY1 key for authentication and AES128 with ENCRYPTKEY1 key for encryption. Access to the group GROUP1 will be allowed for NMS1 only. ACL 2001 will be configured for that restriction.

[LabnarioR1]snmp-agent
[LabnarioR1]snmp-agent sys-info version v3
[LabnarioR1]snmp-agent group v3 GROUP1 privacy acl 2001

[LabnarioR1]acl 2001
[LabnarioR1-acl-basic-2001]rule 10 permit source 150.100.12.1 0.0.0.0 
 
[LabnarioR1]snmp-agent usm-user v3 NMS1 GROUP1 authentication-mode sha AUTHKEY1 privacy-mode aes128 ENCRYPTKEY1

As a next step let’s configure trap messages to be sent from our LabnarioR1 router to the NMS1, using traps parameter sending list name NMSTRAPS1:

[LabnarioR1]snmp-agent trap enable

[LabnarioR1]snmp-agent target-host trap-hostname NMS1 address 150.100.12.1 trap-paramsname NMS1TRAPS

Traps will be authenticated at the receive end and encrypted at the transmit end (privacy keyword). Transmission protocol will be SNMPv3. Let’s configure traps parameter sending list NMS1TRAPS:

[LabnarioR1]snmp-agent target-host trap-paramsname NMS1TRAPS v3 securityname NMS1 privacy

As a source IP of traps generated, loopback1 address will be used:

[LabnarioR1]snmp-agent trap source LoopBack1

Equipment administrator’s contact information allows the NMS administrator to call equipment administrator in case of a failure:

[LabnarioR1]snmp-agent sys-info contact CALL 0800-123456789

For verification use the commands as below:

[LabnarioR1]dis snmp-agent group GROUP1

   Group name: GROUP1 
   Security model: v3 AuthPriv
   Readview: ViewDefault 
   Writeview:  
   Notifyview:  
   Storage type: nonVolatile 
   Acl: 2001

[LabnarioR1]dis snmp-agent usm-user 
   User name: NMS1 
   Engine ID: 800007DB03000000000000 
   Group name: GROUP1 
   Authentication mode: sha, Privacy mode: aes128 
   Storage type: nonVolatile 
   User status: active 
   Acl: 2001

   Total number is 1 

[LabnarioR1]dis snmp-agent target-host 
   Traphost list:
   Target host name: NMS1 
   Traphost address: 150.100.12.1 
   Traphost portnumber: 162   
   Target host parameter: NMS1TRAPS 

   Total number is 1 

   Parameter list trap target host:
   Parameter name of the target host: NMS1TRAPS 
   Message mode of the target host: SNMPV3 
   Trap version of the target host: v3 
   Security name of the target host: NMS1 
   Security level of the target host: privacy 

   Total number is 1 

[LabnarioR1]display snmp-agent sys-info contact 
   The contact person for this managed node: 
           CALL 0800-123456789

Read More »

bootrom update on Huawei S5300 switch

Some time ago I had a case with damaged file system on Huawei S5300 switch. It had been caused by power failure on one site. The switch was not able to decompress VRP software and rebooted itself all the time.

BIOS LOADING ...
Copyright (c) 2008-2010 HUAWEI TECH CO., LTD.
(Ver107, Jan 18 2011, 22:52:53)

Press Ctrl+B to enter BOOTROM menu... 1
Auto-booting...
Update Epld file ............................ None
Decompressing VRP software ..................

BIOS LOADING ...
Copyright (c) 2008-2010 HUAWEI TECH CO., LTD.
(Ver107, Jan 18 2011, 22:52:53)

Press Ctrl+B to enter BOOTROM menu... 1
Auto-booting...
Update Epld file ............................ None
Decompressing VRP software ..................

To reactivate this switch we decided to upload a new software file to the flash of the switch. It was not enough space to do it, so format flash was necessary.

Press Ctrl+B to enter BOOTROM menu...
password: 
          BOOTROM  MENU
    1. Boot with default mode
    2. Enter serial submenu
    3. Enter startup submenu
    4. Enter ethernet submenu
    5. Enter filesystem submenu
    6. Modify BOOTROM password
    7. Reboot

Enter your choice(1-7): 5

         FILESYSTEM SUBMENU

    1. Erase Flash            
    2. Format flash           
    3. Delete file from Flash 
    4. Rename file from Flash 
    5. Display Flash files    
    6. Update EPLD file       
    7. Update FansCard File   
    8. Return to main menu    

Enter your choice(1-8): 5
No. File Size(bytes)     Created Date       File Name
=================================================================                    
6:  14139156 bytes   Apr 26 2013 00:20:11   s5300ei-v200r001c00spc300.cc        
7:  384384   bytes   Oct 01 2008 00:12:05   bootrom009.bin                      
8:  15355    bytes   Oct 28 2013 12:36:13   vrpcfg.cfg                                        
11:  11113860 bytes   Apr 24 2013 14:37:10   s5300ei-v100r005c01spc100.cc        
12:  58044    bytes   Apr 26 2013 00:13:51   s5300ei-v200r001sph006.pat                   
Total: 30008KB(Free: 4240KB)

 FILESYSTEM SUBMENU

    1. Erase Flash            
    2. Format flash           
    3. Delete file from Flash 
    4. Rename file from Flash 
    5. Display Flash files    
    6. Update EPLD file       
    7. Update FansCard File   
    8. Return to main menu    

Enter your choice(1-8): 2

Note: Format flash will damage Flash file system.
      Format flash? Yes or No(Y/N): y

Formatting Flash, please waiting several minutes ............................................................................................................................................................. done

Let’s look at free space on the flash memory:

FILESYSTEM SUBMENU

    1. Erase Flash            
    2. Format flash           
    3. Delete file from Flash 
    4. Rename file from Flash 
    5. Display Flash files    
    6. Update EPLD file       
    7. Update FansCard File   
    8. Return to main menu    

Enter your choice(1-8): 5
No. File Size(bytes)     Created Date       File Name
=================================================================
Total: 30008KB(Free: 30000KB)

The memory has been freed.

Glad we started loading the new VRP file to the flash by FTP. How to upload a new file to S5300 you can see on the article: “console password recovery Huawei S5300“.

And we encountered the second problem. We were not able to upload this file due to lack of free space of the flash memory, even though it has been formatted. To solve this problem we decided to update bootrom. Below a whole procedure how to do this:

BOOTROM  MENU

    1. Boot with default mode
    2. Enter serial submenu
    3. Enter startup submenu
    4. Enter ethernet submenu
    5. Enter filesystem submenu
    6. Modify BOOTROM password
    7. Reboot

Enter your choice(1-7): 4

          ETHERNET  SUBMENU

    1. Download file to SDRAM through ethernet interface and reboot the system
    2. Download file to Flash through ethernet interface
    3. Modify ethernet interface boot parameter
    4. Return to main menu

Be sure to select 3 to modify boot parameter before downloading!

Enter your choice(1-4): 3

          BOOTLINE  SUBMENU

    1. Set TFTP protocol parameters
    2. Set FTP protocol parameters
    3. Return to ethernet menu

Enter your choice(1-3): 2
'.' = clear field;  '-' = go to previous field;  ^D = quit
Load File name      : SV100R002C02B152_for_5300.cc S5300EI-bootrom.bin
Switch IP address   : 192.168.130.53 
Server IP address   : 192.168.130.137 
FTP User Name       : a huawei
FTP User Password   : a huawei

Starting to write BOOTLINE into flash ... done

           BOOTLINE  SUBMENU

    1. Set TFTP protocol parameters
    2. Set FTP protocol parameters
    3. Return to ethernet menu

Enter your choice(1-3): 3

          ETHERNET  SUBMENU

    1. Download file to SDRAM through ethernet interface and reboot the system
    2. Download file to Flash through ethernet interface
    3. Modify ethernet interface boot parameter
    4. Return to main menu

Be sure to select 3 to modify boot parameter before downloading!
Enter your choice(1-4): 1
boot device          : mottsec
unit number          : 0 
processor number     : 0 
host name            : host
file name            : S5300EI-bootrom.bin
inet on ethernet (e) : 192.168.130.53
host inet (h)        : 192.168.130.137
user (u)             : huawei
ftp password (pw)    : huawei
flags (f)            : 0x0 

Attached TCP/IP interface to mottsec0.
Warning: no netmask specified.
Attaching network interface lo0... done.
Loading... 
Read file to sdram .Done
Warning: Don't Power-off or Reset the Device!!!
Update bootrom system ... done !

           ETHERNET  SUBMENU

    1. Download file to SDRAM through ethernet interface and reboot the system
    2. Download file to Flash through ethernet interface
    3. Modify ethernet interface boot parameter
    4. Return to main menu

Enter your choice(1-4): 4

          BOOTROM  MENU

    1. Boot with default mode
    2. Enter serial submenu
    3. Enter startup submenu
    4. Enter ethernet submenu
    5. Enter filesystem submenu
    6. Modify BOOTROM password
    7. Reboot

Enter your choice(1-7): 7
Reboot...

The bootrom has been updated.

After update you can see that the command for updating bootrom has also been changed. It looks more intuitively now:

BOOTROM  MENU

    1. Boot with default mode
    2. Enter serial submenu
    3. Enter startup submenu
    4. Enter ethernet submenu
    5. Enter filesystem submenu
    6. Modify BOOTROM password
    7. Clear password for console user 
    8. Reboot

Enter your choice(1-8): 4

          ETHERNET  SUBMENU

    1. Update BOOTROM system
    2. Download file to Flash through ethernet interface
    3. Upload Configuration file to Ftp through ethernet interface
    4. Modify ethernet interface boot parameter
    5. Return to main menu

Be sure to select 4 to modify boot parameter before downloading!
Enter your choice(1-5):

After bootrom update there was not any problem to upload the new VRP software file to the switche’s flash memory.

Read More »

source interfaces for management communication

As you know, configuring management services on Huawei devices, you can add source interface or IP address for transmitting packets. This is an optional configuration. Below you can find configuration syntax for source interfaces in management communication. If you find out that anything else should be added to this list, just let me know.

Info-center source:
[labnario]info-center loghost source ?
  Aux              AUX interface
  Eth-Trunk        Ethernet Trunk interface
  GigabitEthernet  GigabitEthernet interface
  LoopBack         LoopBack interface
  NULL             NULL interface
  Pos              POS interface
Radius server source:
[labnario-radius-test]radius-server source interface ?
  Eth-Trunk        Ethernet Trunk interface
  GigabitEthernet  GigabitEthernet interface
  LoopBack         LoopBack interface
  Pos              POS interface
HWtacacs server source:
[labnario-hwtacacs-test]hwtacacs-server source-ip ?
  X.X.X.X  IP address

FTP server source:

[labnario]ftp server-source ?
  -a  Set the FTP server source address
  -i  Set a source interface of an FTP server
FTP client source:
[labnario]ftp client-source ?
  -a  Set the FTP client source
  -i  Set loopback for FTP client source interface
TFTP client source:
[labnario]tftp client-source ?
  -a  Set TFTP client's source address
  -i  Configure the source interface of a TFTP client
Telnet server source:
[labnario]telnet server-source -i ?
  Loopback  Interface type
Telnet client source:
[labnario]telnet client-source ?
  -a  Set TELNET client's source address
  -i  Configure the source interface of a TELNET client
SSH server source:
[labnario]ssh server-source -i ?
  Loopback  Interface type
SNMP source:
[labnario]snmp-agent trap source ?
  Atm-Trunk         ATM Trunk interface
  Aux               AUX interface
  Cpos-Trunk        CPOS Trunk interface
  Eth-Trunk         Ethernet Trunk interface
  GigabitEthernet   GigabitEthernet interface
  Global-Mp-Group   Global-Mp-group interface
  Ima-group         ATM IMA interface
  Ip-Trunk          IP Trunk interface
  Logic-Channel     Logic tunnel interface
  LoopBack          LoopBack interface
  MTunnel           MTunnel interface
  Mp-group          Mp-group interface
  Pos               POS interface
  Ring-if           RPR logic interface
  Tunnel            Tunnel interface
  Virtual-Ethernet  Virtual ethernet interface
  Virtual-Template  Virtual template interface
  Vlanif            Vlan interface
NTP source:
[labnario]ntp-service source-interface ?
  Aux              AUX interface
  Eth-Trunk        Ethernet Trunk interface
  GigabitEthernet  GigabitEthernet interface
  LoopBack         LoopBack interface
  NULL             NULL interface
  Pos              POS interface

Read More »

from Huawei CLI – upgrade rollback …

As I am in the process of upgrading Huawei ATN950B routers, I decided to describe very useful command, supported by carrier class routers like NE40E, CX600 and ATN950B – “upgrade rollback enable rollback-timer time”

When you are doing upgrade, there is always a small risk that something goes wrong and you will lose this router, I mean it will fall out of management. To minimize such risk, you can use the command in question.

Let’s look at the upgrade procedure:

<labnario>startup system-software v200r002c00spc300.cc
Info: Succeeded in setting the software for booting system.
<labnario>startup system-software v200r002c00spc300.cc slave-board
Info: Succeeded in setting the software for booting system.

<labnario>startup patch v200r002sph008.pat
Info: Succeeded in setting main board resource file for system.
<labnario>startup patch v200r002sph008.pat slave-board
Info: Succeeded in setting slave board resource file for system.

<labnario>display startup
MainBoard:
  Configured startup system software:        cfcard:/v200r001c02spc300.cc
  Startup system software:                   cfcard:/v200r001c02spc300.cc
  Next startup system software:              cfcard:/v200r002c00spc300.cc
  Startup saved-configuration file:          cfcard:/vrpcfg.cfg
  Next startup saved-configuration file:     cfcard:/vrpcfg.cfg
  Startup paf file:                          default
  Next startup paf file:                     default
  Startup license file:                      default
  Next startup license file:                 default
  Startup patch package:                     cfcard:/v200r001sph005.pat
  Next startup patch package:                cfcard:/v200r002sph008.pat
SlaveBoard:
  Configured startup system software:        cfcard:/v200r001c02spc300.cc
  Startup system software:                   cfcard:/v200r001c02spc300.cc
  Next startup system software:              cfcard:/v200r002c00spc300.cc
  Startup saved-configuration file:          cfcard:/vrpcfg.cfg
  Next startup saved-configuration file:     cfcard:/vrpcfg.cfg
  Startup paf file:                          default
  Next startup paf file:                     default
  Startup license file:                      default
  Next startup license file:                 default
  Startup patch package:                     cfcard:/v200r001sph005.pat
  Next startup patch package:                cfcard:/v200r002sph008.pat
<labnario>check startup next
Main board:
Check startup software.......ok
Check configuration file.....ok
Check PAF....................ok
Check License................ok
Check Patch..................ok
PAF is fitted with startup software
License is fitted with startup software
Patch is fitted with startup software
Slave board:
Check startup software.......ok
Check configuration file.....ok
Check PAF....................ok
Check License................ok
Check Patch..................ok
PAF is fitted with startup software
License is fitted with startup software
Patch is fitted with startup software
Startup software in slave board is fitted with main board.

<labnario>upgrade rollback enable rollback-timer 30
Info:The state of upgrade rollback is enable. Limit time is 30 minutes.
If no User cancels the function, the main MPU will restart by the bootfile cfcard:/v200r001c02spc300.cc.The slave MPU will restart by the bootfile cfcard:/v200r001c02spc300.cc.

<labnario>display upgrade rollback
Info:The state of upgrade rollback is enable. Limit time is 30 minutes.
If no User cancels the function, the main MPU will restart by the bootfile cfcard:/v200r001c02spc300.cc.The slave MPU will restart by the bootfile cfcard:/v200r001c02spc300.cc.

<labnario>reboot

By default, the version rollback function is disabled. Before restarting ATN 950B, during the upgrade, you can run the upgrade rollback enable command to specify the period, from the time when the system software is restarted to the time when ATN 950B performs the rollback. During the specified period, if you don’t telnet to ATN 950B or run the undo upgrade rollback command, by connecting the PC to ATN 950B through the serial port, ATN 950B will perform the rollback.

After the upgrade rollback enable command is run to enable the version rollback function for ATN 950B, you can disable the function after telneting to ATN 950B:

<labnario>display upgrade rollback
Info:The state of upgrade rollback is disable.

As you can see, version rollback has been automatically disabled, after you had entered the router by telnet.

If you log in to ATN 950B through a serial port, you need to run the undo upgrade rollback command to disable the function. Otherwise, the router will perform the rollback.

<labnario>undo upgrade rollback
Info:The state of upgrade rollback is disable.

Read More »