Tuesday , July 1 2025

from Huawei CLI – upgrade rollback …

As I am in the process of upgrading Huawei ATN950B routers, I decided to describe very useful command, supported by carrier class routers like NE40E, CX600 and ATN950B – “upgrade rollback enable rollback-timer time”

When you are doing upgrade, there is always a small risk that something goes wrong and you will lose this router, I mean it will fall out of management. To minimize such risk, you can use the command in question.

Let’s look at the upgrade procedure:

<labnario>startup system-software v200r002c00spc300.cc
Info: Succeeded in setting the software for booting system.
<labnario>startup system-software v200r002c00spc300.cc slave-board
Info: Succeeded in setting the software for booting system.

<labnario>startup patch v200r002sph008.pat
Info: Succeeded in setting main board resource file for system.
<labnario>startup patch v200r002sph008.pat slave-board
Info: Succeeded in setting slave board resource file for system.

<labnario>display startup
MainBoard:
  Configured startup system software:        cfcard:/v200r001c02spc300.cc
  Startup system software:                   cfcard:/v200r001c02spc300.cc
  Next startup system software:              cfcard:/v200r002c00spc300.cc
  Startup saved-configuration file:          cfcard:/vrpcfg.cfg
  Next startup saved-configuration file:     cfcard:/vrpcfg.cfg
  Startup paf file:                          default
  Next startup paf file:                     default
  Startup license file:                      default
  Next startup license file:                 default
  Startup patch package:                     cfcard:/v200r001sph005.pat
  Next startup patch package:                cfcard:/v200r002sph008.pat
SlaveBoard:
  Configured startup system software:        cfcard:/v200r001c02spc300.cc
  Startup system software:                   cfcard:/v200r001c02spc300.cc
  Next startup system software:              cfcard:/v200r002c00spc300.cc
  Startup saved-configuration file:          cfcard:/vrpcfg.cfg
  Next startup saved-configuration file:     cfcard:/vrpcfg.cfg
  Startup paf file:                          default
  Next startup paf file:                     default
  Startup license file:                      default
  Next startup license file:                 default
  Startup patch package:                     cfcard:/v200r001sph005.pat
  Next startup patch package:                cfcard:/v200r002sph008.pat
<labnario>check startup next
Main board:
Check startup software.......ok
Check configuration file.....ok
Check PAF....................ok
Check License................ok
Check Patch..................ok
PAF is fitted with startup software
License is fitted with startup software
Patch is fitted with startup software
Slave board:
Check startup software.......ok
Check configuration file.....ok
Check PAF....................ok
Check License................ok
Check Patch..................ok
PAF is fitted with startup software
License is fitted with startup software
Patch is fitted with startup software
Startup software in slave board is fitted with main board.

<labnario>upgrade rollback enable rollback-timer 30
Info:The state of upgrade rollback is enable. Limit time is 30 minutes.
If no User cancels the function, the main MPU will restart by the bootfile cfcard:/v200r001c02spc300.cc.The slave MPU will restart by the bootfile cfcard:/v200r001c02spc300.cc.

<labnario>display upgrade rollback
Info:The state of upgrade rollback is enable. Limit time is 30 minutes.
If no User cancels the function, the main MPU will restart by the bootfile cfcard:/v200r001c02spc300.cc.The slave MPU will restart by the bootfile cfcard:/v200r001c02spc300.cc.

<labnario>reboot

By default, the version rollback function is disabled. Before restarting ATN 950B, during the upgrade, you can run the upgrade rollback enable command to specify the period, from the time when the system software is restarted to the time when ATN 950B performs the rollback. During the specified period, if you don’t telnet to ATN 950B or run the undo upgrade rollback command, by connecting the PC to ATN 950B through the serial port, ATN 950B will perform the rollback.

After the upgrade rollback enable command is run to enable the version rollback function for ATN 950B, you can disable the function after telneting to ATN 950B:

<labnario>display upgrade rollback
Info:The state of upgrade rollback is disable.

As you can see, version rollback has been automatically disabled, after you had entered the router by telnet.

If you log in to ATN 950B through a serial port, you need to run the undo upgrade rollback command to disable the function. Otherwise, the router will perform the rollback.

<labnario>undo upgrade rollback
Info:The state of upgrade rollback is disable.

Read More »

HWTACACS configuration on Huawei device

Let’s look at a typical configuration of HWTACACS server on Huawei device:

#
hwtacacs-server template labnario
 hwtacacs-server authentication 172.16.10.1
 hwtacacs-server authorization 172.16.10.1
 hwtacacs-server accounting 172.16.10.1
 hwtacacs-server source-ip 172.16.10.10
 hwtacacs-server shared-key cipher %$%$;XioR#N`7=~][vLDTr2S(2.#%$%$
 undo hwtacacs-server user-name domain-included
#
aaa 
 authentication-scheme hwtacacs
  authentication-mode hwtacacs local
 authorization-scheme hwtacacs
  authorization-mode hwtacacs local
 accounting-scheme hwtacacs
  accounting-mode hwtacacs
 domain default_admin  
  authentication-scheme hwtacacs 
  accounting-scheme hwtacacs
  authorization-scheme hwtacacs
  hwtacacs-server labnario
 local-user labnario password cipher %$%$'3N&Y#>c>Ibb;f:!o4mW(7#h%$%$
 local-user labnario privilege level 15
 local-user labnario service-type telnet terminal ssh ftp
#
user-interface vty 0 4
 authentication-mode aaa
What do we have to do to configure HWTACACS AAA?
  • Configure an HWTACACS server template.
  • Configure authentication, authorization, and accounting schemes.
  • Apply the HWTACACS server template, authentication scheme, authorization scheme, and accounting scheme to the domain.

To ensure redundancy we can configure secondary HWTACAC server:

#
hwtacacs-server template labnario
 hwtacacs-server authentication 172.16.11.1 secondary
 hwtacacs-server authorization 172.16.11.1 secondary
 hwtacacs-server accounting 172.16.11.1 secondary

In such case, if primary server is not available, secondary server is used.

Let’s look at AAA schemes. As you can see the there are backups for authentication and authorization. If HWTACAC authentication fails, local authentication is used. We have the same situation for HWTACAC authorization.

But what happens if accounting fails?

There is not possible to configure backup for accounting. We have 3 options: HWTACAC, local or RADIUS. But only one of them can be selected.

Let’s assume that you use accounting like in the configuration above. After an accounting scheme is applied, if a user goes online, the device sends an accounting-start packet to an accounting server. When the network is working properly, the accounting server responds to the accounting-start packet. If a fault occurs in the network, the device may not receive the response packet from the accounting server. As a result, accounting fails. Finally, when you are trying to log in as local user labnario, you are immediately disconnected with information:

The connection was closed by the remote host.

Of course there is a way out of this situation by using “accounting start-fail online” command.

The final backup configuration of AAA should look like:

# 
aaa 
 authentication-scheme hwtacacs 
  authentication-mode hwtacacs local 
 authorization-scheme hwtacacs 
  authorization-mode hwtacacs local 
 accounting-scheme hwtacacs 
  accounting-mode hwtacacs 
  accounting start-fail online

Read More »

Huawei eNSP – news

A new version of Huawei network simulation platform has been released. The new eNSP supports AC6605 POE feature. Besides that a few bugs have been solved, among other firewall crashed (often reported) problem when running on Win8 and Win8.1.

Just click on the picture and download it:

huawei-enterprise-network-simulation-platform


Read More »

how to change the size of the history command buffer

I spent last week skiing in Polish winter capital – Zakopane. You probably noticed that I didn’t post any new article but weather was wonderful and I had no motivation to turn on my notebook ;).

As plenty of things, after my vacation, keeping me busy, today a short post about command buffer size.

By default the size of the history command buffer is 10. This means that last 10 commands entered by the user can be stored on the memory and repeated using the CLI “↑” key. The range of the command buffer can be tuned and its range is 0 to 256.

How to change the size of the history command buffer?
[labnarioR1]user-interface vty 1
[labnarioR1-ui-vty1] history-command max-size 50

Now, using the CLI “↑” key, we can repeat last 50 commands entered by the user. Command can be used on Console, VTY and TTY user terminal interfaces.

Read More »

L2TP LAC-auto-initiated tunnel mode

 Layer 2 tunneling protocol (L2TP) connection can be established in the following tree modes:

  • NAS-initializated
  • Client-initializated
  • LAC-auto-initializated.

This is not my job to tell you about the theory. You can find plenty of information about L2TP on the internet. Let’s focus today on the third mode.

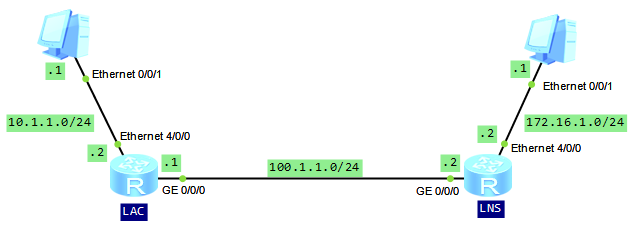
In most cases, an L2TP user directly dials up to a LAC, and only PPP connection is established between the user and LAC. Unlike NAS and Client-initializated modes, in LAC-auto-initializated mode users can connect to the LAC by sending IP packets. At the same time LAC needs to have a PPP user created and a tunnel with the LNS established. The two ends of an L2TP tunnel reside on LAC and LNS respectively. As you can see from the topology below, in LAC-auto-initiated mode, LAN can be directly connected to LAC.

L2TP topology

Let’s look how to configure L2TP on Huawei routers.

Configure IP addresses for the user-side and public-network-side interfaces on LAC and LNS:

LAC
#
interface Ethernet4/0/0
 ip address 10.1.1.2 255.255.255.0 
#
interface GigabitEthernet0/0/0
 ip address 100.1.1.1 255.255.255.0 

LNS
#
interface Ethernet4/0/0
 ip address 172.16.1.2 255.255.255.0 
#
interface GigabitEthernet0/0/0
 ip address 100.1.1.2 255.255.255.0

Enable L2TP globally on LAC and configure parameters of L2TP group to establish an L2TP connection to LNS:

[LAC]l2tp enable 
[LAC]l2tp-group 1
[LAC-l2tp1]tunnel name lac
[LAC-l2tp1]tunnel password simple  labnario
[LAC-l2tp1]start l2tp ip 100.1.1.2 fullusername labnario

Configure authentication mode, user name and password for virtual-template interface. IP address will be negotiated:

[LAC]interface Virtual-Template 1
[LAC-Virtual-Template1]ppp authentication-mode chap 
[LAC-Virtual-Template1] ppp chap user labnario
[LAC-Virtual-Template1] ppp chap password simple labnario
[LAC-Virtual-Template1] ip address ppp-negotiate

Enable LAC to dial up and establish an L2TP tunnel:

[LAC-Virtual-Template1]l2tp-auto-client enable

Configure a static route so that packets sent to 172.16.1.0 are forwarded through L2TP tunnel:

[LAC]ip route-static 172.16.1.0 255.255.255.0 Virtual-Template1

Configure AAA on the LNS:

[LNS]display current-configuration configuration aaa
#
aaa 
 local-user labnario password cipher %$%$9\1U#=BaE-BjypW#.c8!8I$K%$%$
 local-user labnario service-type ppp

Configure an IP address pool to allocate an IP address to the dial-up interface of the LAC:

[LNS]ip pool 1
[LNS-ip-pool-1]gateway-list 192.168.1.1 
[LNS-ip-pool-1] network 192.168.1.0 mask 255.255.255.0

Create a virtual interface template and configure PPP negotiation parameters:

[LNS]interface Virtual-Template1
[LNS-Virtual-Template1] ppp authentication-mode chap 
[LNS-Virtual-Template1] remote address pool 1
[LNS-Virtual-Template1] ip address 192.168.1.1 255.255.255.0

Enable L2TP and configure parameters for an L2TP group:

[LNS]l2tp enable 
[LNS]l2tp-group 1
[LNS-l2tp1]allow l2tp virtual-template 1 remote lac
[LNS-l2tp1] tunnel password simple  labnario
[LNS-l2tp1] tunnel name lns

Configure a static route so that packets sent to 10.1.1.0 are forwarded through L2TP tunnel:

[LNS]ip route-static 10.1.1.0 255.255.255.0 Virtual-Template1

Verify if L2TP session was established properly:

[LAC]dis l2tp session 

 LocalSID  RemoteSID  LocalTID  
  1         1          1          

 Total session = 1

[LAC]dis l2tp tunnel 

 Total tunnel = 1
 LocalTID RemoteTID RemoteAddress    Port   Sessions RemoteName
 1        1         100.1.1.2        42246  1        lns

Check communication between PCs:

PC>ping 172.16.1.1

Ping 172.16.1.1: 32 data bytes, Press Ctrl_C to break
From 172.16.1.1: bytes=32 seq=1 ttl=126 time=16 ms
From 172.16.1.1: bytes=32 seq=2 ttl=126 time=15 ms
From 172.16.1.1: bytes=32 seq=3 ttl=126 time=15 ms
From 172.16.1.1: bytes=32 seq=4 ttl=126 time=16 ms
From 172.16.1.1: bytes=32 seq=5 ttl=126 time<1 ms

--- 172.16.1.1 ping statistics ---
  5 packet(s) transmitted
  5 packet(s) received
  0.00% packet loss
  round-trip min/avg/max = 0/12/16 ms

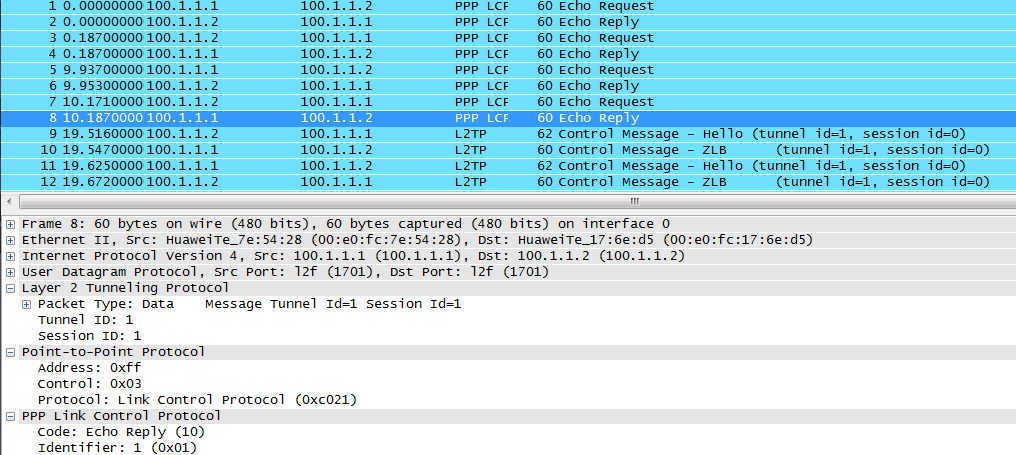
Let’s catch packets on the link between LAC and LNS:

L2TP capture packets

Read More »